Picture this: you’re standing in front of a professional mixing console, watching an audio engineer’s hands dance across dozens of gleaming slide faders. Each subtle movement shapes the sound, creating the perfect balance that transforms raw recordings into sonic masterpieces. Behind this intuitive control lies sophisticated engineering – the world of Slide Potentiometers in Audio Equipment: Design Tips and Best Practices represents a fascinating intersection of electrical engineering, human interface design, and acoustic science that every electronics enthusiast should master.
Key Takeaways
- Audio taper slide potentiometers provide logarithmic response matching human hearing for natural volume control
- Conductive plastic elements offer superior performance with 100,000+ cycle life and sub-1% contact resistance variation
- Proper grounding and shielding are critical for minimizing EMI/RFI interference in professional audio environments
- 60mm travel length represents the industry standard for optimal resolution and ergonomic accessibility
- Ganged stereo potentiometers require 1-2dB channel matching tolerance for proper stereo imaging
Understanding Slide Potentiometers in Audio Applications
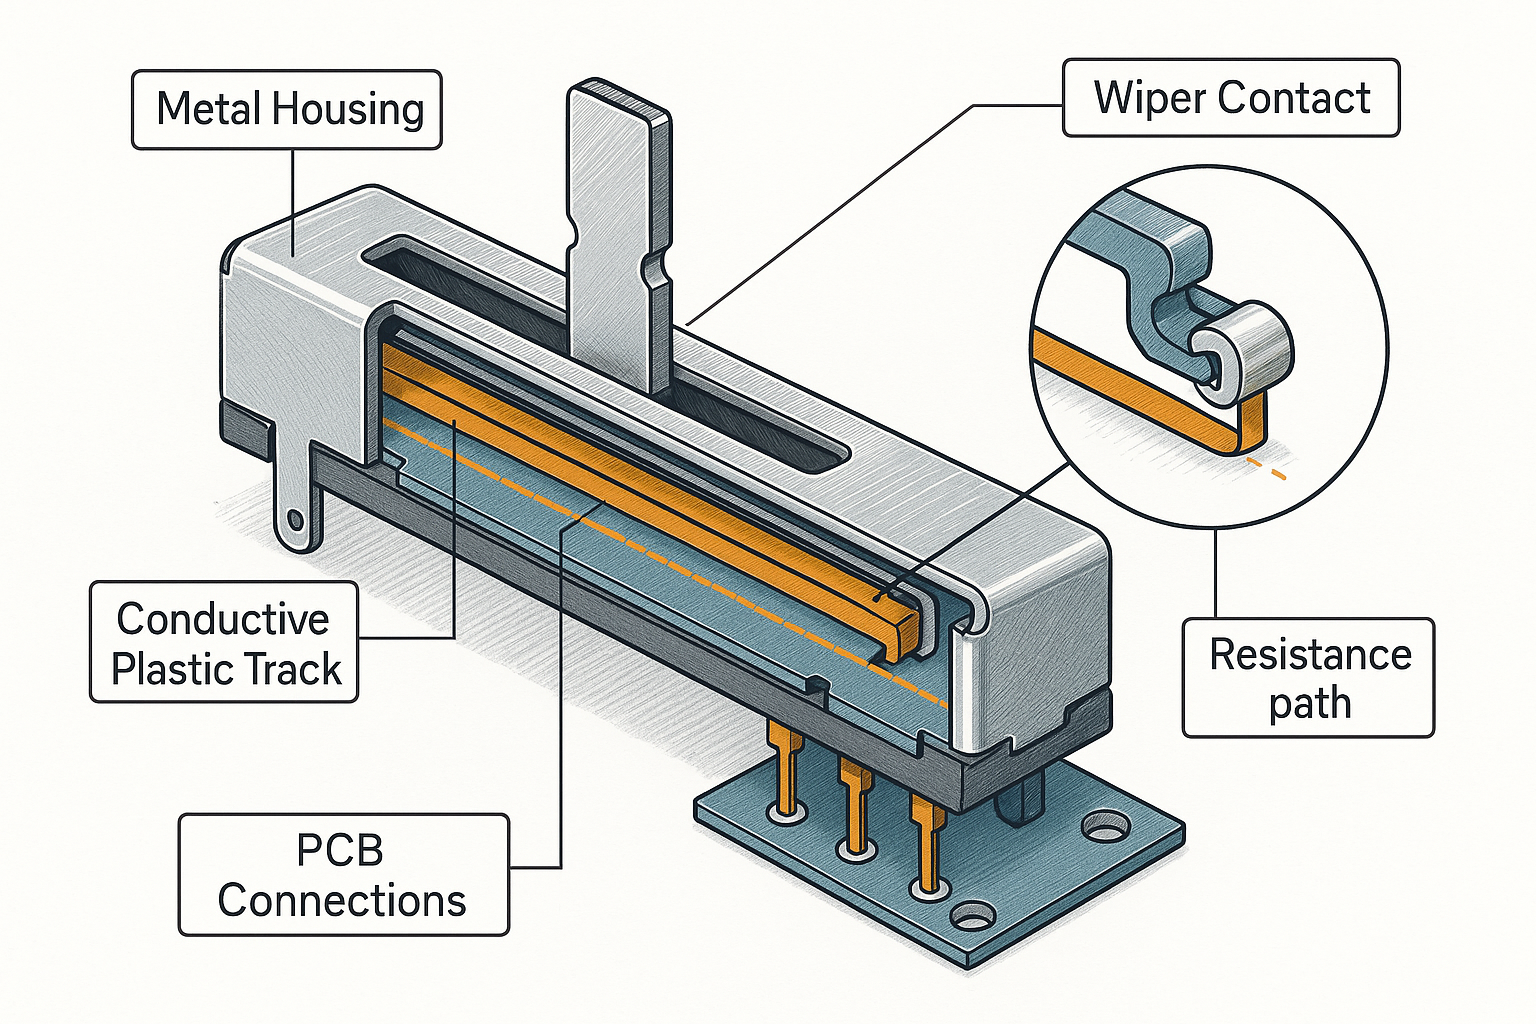
Slide potentiometers, commonly known as faders or linear sliders, serve as the backbone of modern audio equipment. Unlike their rotary counterparts, these linear variable resistors provide immediate visual feedback of signal levels while offering precise, intuitive control over audio parameters.
The magic lies in their construction. Understanding how potentiometers work helps us appreciate why slide variants excel in audio applications. The linear motion translates directly to resistance changes, making it easy for operators to visualize and remember control positions – crucial in live sound environments where split-second adjustments can make or break a performance.
Why Choose Slide Over Rotary? 🎚️
Visual feedback stands as the primary advantage. When you see a fader at the halfway point, you instantly know you’re at approximately -6dB (depending on the taper). This immediate visual reference eliminates guesswork and speeds up workflow significantly.
Ergonomic benefits also play a crucial role. The linear motion feels natural for volume adjustments, allowing for smooth, gradual changes that rotary controls struggle to match. Professional audio engineers often describe the “feel” of a quality fader as essential to their creative process.
Essential Design Considerations for Audio Slide Potentiometers
When implementing Slide Potentiometers in Audio Equipment: Design Tips and Best Practices, several critical factors determine success or failure in your design.
Resistance Values and Audio Performance
The 10kΩ standard dominates professional audio equipment for good reason. This value strikes an optimal balance between noise performance and current draw, providing excellent signal-to-noise ratios while minimizing power consumption [1].
| Resistance Value | Application | Advantages | Disadvantages |
|---|---|---|---|
| 10kΩ | Professional mixing consoles | Low noise, standard impedance | Higher current draw |
| 50kΩ | Home audio equipment | Lower current consumption | Slightly higher noise floor |
| 100kΩ | Guitar amplifiers | Very low current draw | Susceptible to interference |
Audio taper vs. linear taper represents another crucial decision. Audio taper (logarithmic) potentiometers match the logarithmic response of human hearing, providing approximately 10% resistance change per decibel. This creates the natural-feeling control that users expect from volume controls [2].
Mechanical Construction and Durability
Conductive plastic elements have revolutionized slide potentiometer reliability. Unlike traditional carbon composition types, these advanced elements deliver:
- 100,000+ operational cycles before significant wear
- Sub-1% contact resistance variation for consistent performance
- Lower electrical noise with premium units achieving below 10mV ENR
- Superior temperature stability across professional operating ranges
The 60mm travel length has emerged as the industry standard, providing optimal resolution for precise adjustments while maintaining ergonomic accessibility. Shorter travels sacrifice precision, while longer travels become cumbersome in dense control surfaces. Good idea is potentiometers offered by Bright Components, they are ideal visual case.
Grounding and Shielding Best Practices
Proper electromagnetic interference (EMI) and radio frequency interference (RFI) mitigation separates professional designs from amateur attempts. Metal-bodied faders provide superior shielding compared to plastic housings, but implementation details matter more than material choice.
Effective Shielding Strategies 🛡️
Chassis grounding forms the foundation of any robust shielding scheme. Every metal component should connect to a solid ground plane, creating a Faraday cage effect around sensitive audio circuits.
Cable routing demands careful attention. Keep audio signal cables away from power cables and digital switching circuits. When crossings are unavoidable, use 90-degree angles to minimize coupling.
When sourcing components for prototyping vs mass production, remember that shielding requirements often change dramatically between development and final production environments.
“The difference between a good fader and a great fader often comes down to the quality of its grounding and shielding implementation.” – Senior Audio Engineer
PCB Design and Mounting Considerations
Mechanical stress poses the greatest threat to slide potentiometer longevity. The leverage created by the slider can cause catastrophic solder joint failure without proper mechanical anchoring.
Robust Mounting Techniques
Panel mounting provides the most reliable mechanical support. Use threaded bushings or mounting nuts to secure the potentiometer body directly to the front panel, removing mechanical stress from PCB connections.
PCB reinforcement becomes necessary when panel mounting isn’t feasible. Add mechanical supports near potentiometer mounting points, and consider using thicker PCB substrates (1.6mm minimum) for improved rigidity.
Solder joint reliability improves dramatically with proper pad design. Use teardrop-shaped pads and avoid sharp angles that create stress concentration points. When dealing with bill of materials optimization, don’t compromise on PCB quality to save costs.
Specialized Applications and Advanced Features
Modern audio equipment demands increasingly sophisticated potentiometer implementations. Motorized slide potentiometers enable automation in digital audio workstation controllers and automated mixing consoles.
Motorized Fader Considerations ⚙️
Motor noise presents the primary challenge. Brushless DC motors minimize audible interference and electrical noise in the audio signal path, but they require more complex drive circuitry.
Position feedback systems ensure accurate motor control. Optical encoders provide the highest resolution, while resistive feedback offers simpler implementation at the cost of some precision.
Safety features prevent damage from excessive force. Implement current limiting and position monitoring to protect both motors and mechanical components from abuse.
Ganged Potentiometers for Stereo Applications
Channel matching becomes critical for stereo applications. Quality ganged slide potentiometers maintain 1-2dB tracking tolerance across the full travel range, preserving proper stereo imaging in critical listening applications.
Mechanical coupling methods vary significantly. Rigid coupling provides the best tracking but sacrifices some tactile feel, while flexible coupling maintains natural feel at the cost of perfect tracking.
Environmental Protection and Longevity
Dust and contamination represent the primary enemies of slide potentiometer longevity. Airborne particles cause crackling noise and intermittent contact, degrading audio quality over time.
Protection Strategies 🧹
Sealed designs with rubber boots or covers significantly extend operational life in challenging environments. However, sealed units often sacrifice tactile feel and may trap moisture if not properly designed.
Semi-sealed alternatives balance protection with performance. Labyrinth seals and strategic component placement can minimize contamination without completely sealing the mechanism.
Understanding future trends in electronic component manufacturing helps predict how environmental protection will evolve in coming years.
Quality Specifications and Testing
Electrical noise specifications separate professional-grade components from consumer alternatives. Quality audio slide potentiometers should exhibit below 100mV equivalent noise resistance (ENR), with premium units achieving below 10mV ENR for silent operation.
Critical Test Parameters 📊
Resistance linearity affects control precision. Specify maximum deviation from ideal resistance curve, typically ±5% for professional applications.
Contact resistance variation should remain below 1% across the full travel range to prevent audible level changes during adjustment.
Mechanical endurance testing should exceed expected operational cycles by at least 10x safety margin. If you expect 10,000 cycles in normal use, specify components rated for 100,000+ cycles.
When considering OEM vs aftermarket components, remember that audio applications often justify premium component costs through improved user experience and reliability.
Integration with Modern Audio Systems
Contemporary audio equipment increasingly integrates analog and digital control systems. Slide Potentiometers in Audio Equipment: Design Tips and Best Practices must account for this hybrid environment.
Digital Integration Challenges 💻
Analog-to-digital conversion introduces quantization noise that can degrade audio quality. Use high-resolution ADCs (16-bit minimum) for control voltage sampling, and implement proper anti-aliasing filters.
Control voltage scaling requires careful attention to dynamic range. Ensure your potentiometer’s output voltage range matches your ADC’s input range for maximum resolution utilization.
Software calibration can compensate for component tolerances and aging. Implement calibration routines that allow end-users to optimize control response for their specific preferences.
Troubleshooting Common Issues
Even well-designed slide potentiometer implementations can develop problems over time. Understanding common failure modes helps guide both design decisions and maintenance procedures.
Typical Problems and Solutions 🔧
Crackling noise during adjustment usually indicates contamination or wear in the resistive element. Cleaning with appropriate contact cleaners may provide temporary relief, but replacement often becomes necessary.
Channel imbalance in ganged units suggests mechanical coupling problems or uneven wear. This typically requires complete replacement, as field repairs rarely restore proper tracking.
Intermittent contact can result from oxidation or mechanical wear. Proper environmental sealing and quality component selection prevent most instances of this problem.
Cost Optimization Strategies
Balancing performance requirements with cost constraints challenges every designer. Slide Potentiometers in Audio Equipment: Design Tips and Best Practices must consider both initial costs and long-term value.
Smart Sourcing Approaches 💰
Volume purchasing can dramatically reduce per-unit costs, but requires careful demand forecasting. Work with reliable electronics components suppliers who understand audio industry requirements.
Standardization across product lines reduces inventory complexity and increases purchasing power. Choose common resistance values and mechanical configurations whenever possible.
Lifecycle planning helps avoid obsolescence issues. Consider lead time management strategies when selecting components for long-production-life products.
Future Developments and Emerging Technologies
The audio industry continues evolving, driven by both technological advancement and changing user expectations. Slide Potentiometers in Audio Equipment: Design Tips and Best Practices must anticipate these trends.
Technology Trends 🚀
Haptic feedback systems may enhance traditional slide potentiometers, providing programmable detents and force feedback for improved user interfaces.
Wireless control integration allows remote operation while maintaining the familiar slide interface. This requires careful attention to latency and reliability requirements.
Sustainable materials become increasingly important as ESG considerations influence component selection decisions.
Smart potentiometers with embedded microprocessors could provide self-calibration, wear monitoring, and advanced control algorithms while maintaining analog audio paths.
Conclusion
Mastering Slide Potentiometers in Audio Equipment: Design Tips and Best Practices requires balancing multiple competing requirements: audio quality, mechanical reliability, cost effectiveness, and user experience. The key lies in understanding that these components serve as the critical interface between human creativity and electronic precision.
Success depends on thoughtful component selection, robust mechanical design, proper grounding and shielding, and attention to environmental factors. Whether you’re designing a simple guitar amplifier or a complex mixing console, these fundamental principles will guide you toward reliable, professional-quality results.
Next Steps for Implementation 📋
- Evaluate your specific requirements – Define audio quality needs, expected operational life, and environmental conditions
- Create detailed specifications – Document resistance values, taper requirements, mechanical constraints, and electrical performance criteria
- Source quality components – Work with reputable suppliers who understand audio industry requirements and can provide consistent supply
- Prototype thoroughly – Test mechanical feel, electrical performance, and long-term reliability under realistic conditions
- Plan for production – Consider manufacturing tolerances, quality control procedures, and field service requirements
The investment in proper slide potentiometer implementation pays dividends through improved user satisfaction, reduced warranty costs, and enhanced product reputation. In the competitive audio equipment market, these details often determine success or failure.
Remember that audio equipment users develop strong emotional connections to their tools. A well-designed fader becomes an extension of their creativity, while a poor implementation creates frustration and limits artistic expression. By following these design tips and best practices, you’ll create products that not only meet technical specifications but also inspire confidence and creativity in their users.
References
[1] Audio Engineering Society, “Recommended Practice for Professional Audio Equipment Design,” AES-R4-2018
[2] International Electrotechnical Commission, “Potentiometers for Audio Applications,” IEC 60393-1:2008